ALLIED INVASION OF ITALY 1943
SCENARIO: ASSAULT ON HOSPITAL HILL 11-12/9/43
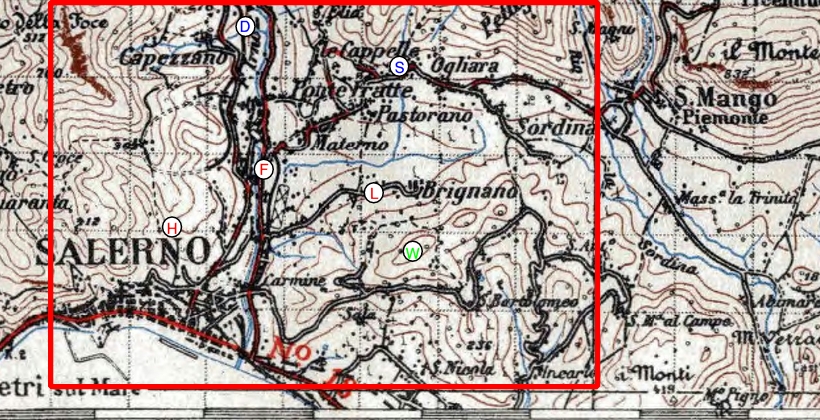
Battle map based on WW2 Topographic Maps from McMaster University Library
Used under Creative Commons Attribution-NonCommercial 2.5 Licence
Click map to enlarge
This battle was a crucial one for the US Fifth Army and sees the Germans launch a heavy counter-attack to the Allied landings from the hills above Salerno. British 46th Infantry Division, under Major General Hawkesworth, has advanced from the beaches and established itself in Salerno. The 139th Infantry Brigade under Brigadier Stott has dug-in in the hills to the North of Salerno. 138th Brigade is further to the West supporting the Commando's at Vietri, and the badly bloodied 128th Brigade is held in reserve to the South of Salerno. The Germans have built up a formidable force with a couple of Kampfgruppe - Dornemann based around the 16 PanzerDivisions Aufklarungs (scout car) battalion, and a second, Kampfgruppe Stroh with Panzer grenadier regiment and Panzer battalion. With the 6pdr anti-tanks still held up at the beaches, 139th Brigade has a tremendous fight in front of it to hold up the German armour with newly issued PIATs and Naval gunfire support.
See map above. Table Outline is in red based on a 6’x4’ table with ground scale of 1inch=100 metres. One map square=1 Kilometer, 10" on table.
When setting up the game on the table it is actually quite a complicated map to try and translate, and we found some of the locations confusing compared with other maps (i.e. Ponte Fratte), so there is as always an element of interpretation here. The key features are Salerno (held by the Divisional recce regiment), the roads running north to Ponte Fratte, the river Irno running down to Salerno which is not fordable except at Fratte and Salerno, and the roads running along the bottom of the hills to the East. A virtual tour of this area via google maps is instructive and shows very steep mountains on the North edge, with low hills throughout covered in scrub trees and bushes. There are scattering of substantial stone buildings throughout, but we had the major villages of Ponte Fratte and Brignano deployed on table.
Allies: The 16th Durham Light Infantry is deployed at position (H), Hospital Hill, but the priests running the hospital (which was to treat the wounded from both sides), have asked the British not to deploy troops inside the hopsital itself. 5th Battalion Sherwood Foresters is deployed in the village of Ponte Fratte (F). The road to Brignano has the 2/5th Battalion Leicstershire Regiment dug in along the roadside at (L). The lightly forested White Cross Hill (W) is significant and is where further battles were fought. There is also a cemetery complex in front of the Leicsters front line.The British also deployed a couple of roadblocks at Fratte (see page 61 KGCIII). The Divisional Reconnaisance Regiment, 46th Recon, was deployed in Salerno where they set-up defensive positions
Germans: Kampfgruppe Dornemann enters the battle at Point D on the Western side of the River Irno which is not crossable except at the bridges of Ponte Fratte and at Salerno itself.
See Pages 59&60. The British should set-up first followed by the German recon which they have 3 Scout actions. The Germans should then deploy their lead Units and the British get 2 Scout actions. The Germans as attackers may make 1 pre-game bombardment from each of their artllery units, using up ammo as per normal. The British have no pre-game bombardment.
The scenario lasts for 10 turns, historically starting at Noon on 11th September 1943, through to the late afternoon of 12 September where reinforcements from 138th Brigade arrive. We've allowed 10 daylight turns of combat, night-time historically was limited to re-forming the line by the British and infiltration by German troops aon Hospital hill.
Battle Victory Points:
Hold Salerno: 4 VP
Hold Ponte Fratte: 2 VP
Hold Hospital Hill: 2 VP
Hold White Cross Hill: 2VP
The historical battle was extremely hard fought. The battle started with a light bombardment by the German forces then an advance towards the British positions. The Durham Light Infantry managed to initially hold KG Dornemann and drive off the initial attack. KG Stroh pushed the Sherwood Foresters back and captured the bridge at Fratte, cutting off the Leicesters from the rest of the Brigade. The battle for Fratte carried on house to house and eventually the Sherwood Foresters recoiled to Salerno itself.
The Leicesters were then engaged and then gradually pushed back out of their defences onto White Cross Hill and broken up by the attacking Panzers and armoured infantry. Eventually Naval gunfire was enough to stop the German advance and the two sides broke off combat for the day to resupply and re-organise. During the night German troops infiltrated Hopsital Hill and launched a major attack early on the 12th pushing back lead company of the DLI. German troops evnetually got into the Hospital buildings and it became a vicious battle.
Over on White Cross Hill the Sherwood Foresters and the Leicesters fought a desperate battle in the woodlands against a fresh German attack, managing to hold onto a position near the top of the hill with naval gunfire and artillery support.
The British had managed to hold on. Salerno was still in Allied hands. Both sides paused for reinforcements and resupply, and the German attack was renewed fruther West at Dragonea defended by No. 2 Commando.
German Reinforcements: none
British Reinforcements: Optionally the GM may only allow Naval support from Turn 4 rather than Turn 1.
Force Morale: 8 7 6 5 4 3 2 1 (see page 37-38)
Combined Arms Rating: Poor (Cost +1, Response -2, must fire at Like Target).
139th Infantry Brigade, 5th US Army
Brigadier R.E.H. Stott
2/5th Battalion Leicestershire Regiment
Lt. Col. ?
Command: +1(+1) Morale: 7 Training: Regular Response:7 Hits:2+1
(1) 3 x Rifle (2) 3 x Rifle (3) 3 x Rifle
(4) 3" Mortar ####
Assets: 1 x MG, 1 x Recce Bren Carrier
Transport: On foot. Mortars and MG's are in carriers.
5th Battalion Sherwood Foresters
Lt. Col. ?
Command: +1(+1) Morale: 7 Training: Regular Response:7 Hits:2+1
(1) 3 x Rifle (2) 3 x Rifle (3) 3 x Rifle
(4) 3" Mortar ####
Assets: 1 x MG, 1 x Recce Bren Carrier
Transport: On foot. Mortars and MG's are in carriers.
16th Battalion Durham Light Infantry Regiment
Lt. Col. J.C. Preston
Command: +1(+1) Morale: 8 Training: Regular Response:7 Hits:2+1
(1) 3 x Rifle (2) 3 x Rifle (3) 3 x Rifle
(4) 3" Mortar ####
Assets: 1 x MG, 1 x Recce Bren Carrier
Transport: On foot. Mortars and MG's are in carriers.
5th Medium Regiment, Royal Artillery
5.5" Guns #### 5.5" Guns #### 5.5" Guns ####
Request: 8 Availability: 6 FV: 6+1 o/s
70th Field Regiment, Royal Artillery
25pdr #### 25pdr #### 25pdr ####
Request: 9 Availability: 8 FV: 3+1 o/s
HMS Mauritius
6" Guns #### 6" Guns #### 4" Guns ####
Request: 8 Availability: 7 FV: 5 / 4
HMS Uganda
6" Guns #### 4" Guns ####
Request: 8 Availability: 6 FV: 5 / 4
Force Morale: 8 7 6 5 4 3 2 1
Combined Arms Rating: Superior (No cost to co-ordinate, +4 to tank defense rolls if escort present).
Elements of 16 Panzer and 15th Panzergrenadier Divisions
Kampfgruppe Dornemann (16 Panzer)
Major Dornemann
Command: +2 (+0) Morale: 8 Training: Regular Response: 9 Hits: 2
(1) 1 x Sdkfz 232, 3 x Sdkfz 222
(2) 3 x PzrGren
(3) 81mm Mortar ### (4) 3 x STUG III (5) 3 x Engineers
Assets: 1 x MG. FO for Werfer Regiment.
Transport: Half-tracks
Werfer-Regiment 71
NW41 ###
Request: 6 FV: 6 -2 Morale Mod
Kampfgruppe Stroh (15 Panzergrenadier)
Oberst. Stroh
I/ Panzergrenadier Regiment 129
Command: +2 (0) Morale: 7 Training: Regular Response: 9 Hits 2+1
(1) 3 x PzrGren (2) 3 x PzrGren (3) 3 x PzrGren
(4) 81mm Mortar ###
(5) 3 x Engineers
Assets: 1 x 20mm Flak, 1 x Pak40 ATK, 1 x Infantry Recce, 2 x MG
Transport: Motorised in Half-Tracks
II/ Panzergrenadier Regiment 129
Command: +2 (0) Morale: 7 Training: Regular Response: 9 Hits 2+1
(1) 3 x PzrGren (2) 3 x PzrGren (3) 3 x PzrGren
(4) 81mm Mortar ###
(5) 3 x Engineers
Assets: 1 x 20mm Flak, 1 x Pak40 ATK, 1 x Infantry Recce, 2 x MG
Transport: Motorised in Trucks
Panzer Abteilung 125
Command: +2 (0) Morale: 7 Training: Regular Response: 8 Hits 2
(1) 2 x PzIV (2) 2 x PzIV (3) 2 x PzIII
Assets: 1 x PzII Recon
Artillery battalion, Artillerie-Regiment 15
150mm Hummel ## 105mm Wespe ## 105mm Wespe ##
Request: 6 Availability: 8 FV: 6/4
Battle Reports are here