ALLIED INVASION OF ITALY 1943
SCENARIO: ASSAULT ON HOSPITAL HILL 11-12/9/43
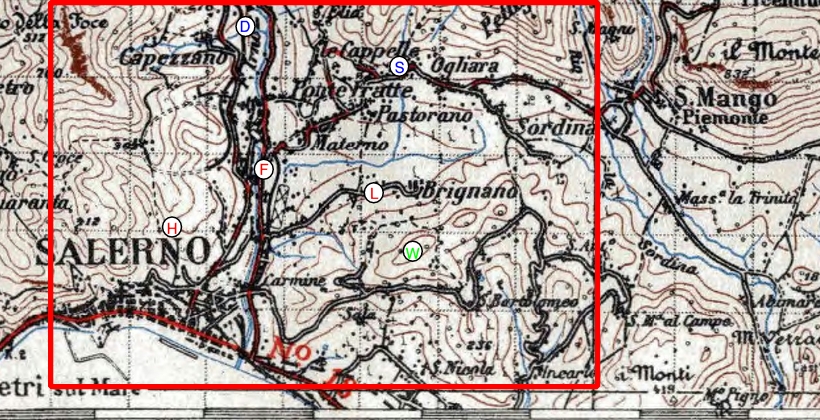
Battle map based on WW2 Topographic Maps from McMaster University Library
Used under Creative Commons Attribution-NonCommercial 2.5 Licence
Click map to enlarge
We hadn't played KGCIII for quite a few months having concentrated on WRG5th/6th this year. It was great to be back on playing WW2 and managed to set-up a convincing looking Salerno battlefield using the period army maps from the usual source and a quick virtual drive around the current area using Google Maps. This is usually very valuable for learning what the battlefield was like - in this case lots of cover, steep mountainous hills on the edges of the battle area and plenty of vinyards, scrubby mediteranean woodlands and scattered stone and brick housing all over the place.
The new buildings from hovels look great but are still to be painted. The battle itself looks like a major tough one for the British as they don't have their usual anti-tank guns with them, from all the sources I could find it looked like they were still at the beach for some reason. 139 Brigade has it's work cut out and was hurridly digging in on the slopes of Hopsital hill, held by th Durhams, the Sherwood Foresters around the village of Fratte, and the Leicesters on the other side of the river covering what looked like a pretty open flank. Dug in beside the road, they looked pretty vulnerable.
The German juggernaut was impressive. Compared with Normandy and other battles in '44 it was great to have an almost fully equipped couple of Kampfgruppe to throw at the Allies. The Germans were however wary of the British artillery which was prodigious, so the plan for Kampfgruppe Stroh on the eastern side of the river was to put the Panzergrenadiers forward first, keeping the Panzers and Stugs off table, and shoot them in with artillery support to close assault the forward British positions. Panzers would then come on and exploit the rear areas and roll into Salerno over the bridges from the East.
On the other side of the river, the Panzer Aufklarungs battalion was simply to dash forward as quickly as possible and see what happened. This all ended in tears pretty quickly as the Durham Light Infantry was well established on Hospital hill and with a company in the hills either side of the German advance. Within the first turn the armoured cars were battered by gunfire and ended up shaken and suppressed not far from their start line. The panzergrenadiers and engineers made a bold advance but raked with fire from all sides, only the grenadiers made it into close assault. They fought a desperate fight over a couple of turns but were wiped out with a platoon lost by the Durhams. The engineers were suppressed by fire and were yet to make it into combat.
On the Eastern side a tremendous battle took place. The German artillery came up trumps and suppressed the forward companies of the Leicesters. British gunfire in response halted the foot bound Panzergrenadiers (trucks left in the rear as enemy so close), early on with some casualties in the scrub. The gepanzert Grenadiers however made good progress and rolled up to the Leicesters unopposed, dismounted and sent two companies forward with another company attempting to mousehole their way into the first building at Fratte.
The Sherwood foresters in Fratte responded though, heavily ensconced in the stone buildings and after some great dice rolling despite being at long range only one grenadier company made into close assault with the Leicesters. A very violent struggle then ensued, going one way then the next and the stakes getting ever higher as the Germans bust into the Leicesters trenches. We really enjoy the Close Combat rules in Kampfgruppe Commander III, they work really well and are very tense. The turn ended with a stalemate and would be picked up the following turn.