4 DAYS IN SEPTEMBER
SCENARIO 1 - XXX CORPS BREAKOUT
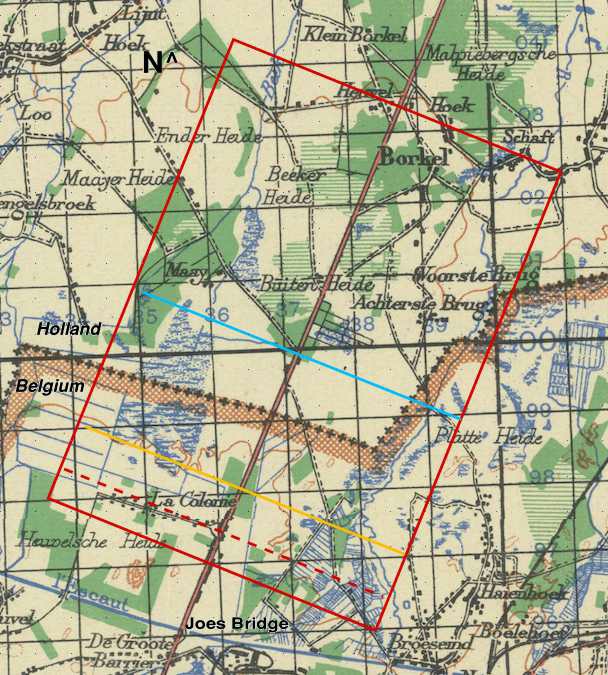
Battle map based on WW2 Topographic Maps from McMaster University Library
Used under Creative Commons Attribution-NonCommercial 2.5 Licence
Click map to enlarge
The first game in the 4 Days in September Campaign using Kampfgruppe Commander 3 rules. This game is set on the afternoon of 17th September 1944 and sees XXX Corps attempt to break-out from their recently captured bridgehead at Joes Bridge on the Dutch/Belgian border in an attempt to reach Eindhoven by nightfall.
British forces were spearheaded by the Irish Guards Battlegroup, consisting of the 2nd (armoured) and 3rd (infantry) battalions under the overall command of J.O.E Vandeleur. These breakthrough troops were supported by a battalion of the Devonshire regiment which advanced in two groups either side of the main road with support from C Squadron 15th/19th The Kings Royal Hussars recce regt.
Both the Guards units were experienced having fought their way through Normandy, and had evolved their organisation and tank-infantry co-operation. They had recently started to deploy in battlegroups of 1 Infantry Battalion and 1 Tank Battalion, with each tank Squadron being assigned an Infantry Company which usually supported the tanks and were known to ride on them. Before this battle the 3rd Battalion had taken heavy casualties, particularly among their officers. The 3rd had just re-organised into 3 rather than 4 companies because of a lack of troops, and in the battle the troops rode in on the tanks, except the lead tank squadron which did not have tank riders.
The German forces facing them were a hastily reinforced blocking line of primarily Fallschirmjager tasked with holding back the British. They had recently attempted a counter attack against the bridgehead at Joes Bridge but this had failed.
See map above. Table Outline is in red based on a standard 6’x4’ table with ground scale of 1inch=100 metres. One map square=1 Kilometer (10" on table)
When setting up the game on the table we had the main road on table, a couple of the minor roads to the West, and the minor road through Borkel. Dashed green woods and the march are light cover. Thick green woods are medium cover. Borkel, Hoek, Shaft and La Colonie are small villages of 1 to two building areas. Other scattered buildings were deployed for scenic purposes only.
Red dotted line: Devonshires may deploy South of this line. Irish Guards enter from main road to South. Yellow Line: German forces may deploy anywhere North of this line, infantry are in camouflaged foxholes. Blue Line: No vehicle movement off-road South of this line as the ground is very boggy. Other marshy blue areas on map are also out of bounds for vehicles.
Allies: Devonshire Group 1 to the West of the road around La Colonie. Group 2 to the East of the road. XXX Corps were lined up on the road back towards Joes Bridge. Leading tank squadron 2nd Battalion Irish Guards had no tank riders, others did from 3rd Battalion Irish Guards.
Germans: The road was a dividing line between the two battalions. Von Hoffman defended the Eastern side of the road with infantry dug in on the Belgian side of the Dutch frontier. There were infantry panzer-killer teams hiding near the main road, and the anti-tank guns and FLAK were deployed along the main road due to lack of transport. Von Hoffmans HQ qas in Achter de Brug. Also around 30 men were placed in an anti-tank ambush with MG and panzerschrek 2.5km behind the front line.
Fallshirmjager regiment 6 is responsible for defending the Western side of the road which they appear to have done from the woodlands.
Further back past the Dutch frontier the SP guns were deployed either side of the main road, at least one was among cottages running alongside the road. Further back still into the woodland were more German ATK guns and the 88 was encountered abandoned before the column reached Valkensward, which lies a little of the map to the NE.
See Page 59 & 60. KGCIII handles these very well. All forces are counted as Hidden before the game starts, using one of the methods used in the rule book, see Observation pgs 27-28 and Scouting in pages 51-52. We use the figures-on-the-table method. The Germans are classed as in Camouflaged positions.
XXX Corps has six preliminary Scouting missions, while the German forces have two.
XXX Corps has significant pre-game bombardment available to use on targets available following the Pre-game recon. This takes the form of each Artillery regiment in the Force list being able to fire 2 additional free fire missions. In addition, two squadrons of 3 Typhoons each make an appearance after the artillery bombardment and may attack as per the Pre-Planned strikes rules on page 63. These automatically appear and no Request roll is required.
Rolling Barrage (Creeping Barrage see page 56) The British have a Rolling Barrage which advances up the sides of the main road ahead of XXX Corps fired by a dedicated medium artillery Regiment. In our re-fights we advanced the barrage about a foot a turn.
The scenario lasts for 8 turns. The British objective is to get the Irish Guards Battlegroup up the road as quickly as possible while neutralising any opposition. The German objective is to prevent this or at least hold-up the British for as long as possible.
Campaign Victory Points: British Irish guards get two units off North end of table, at least 1 armoured, by start turn 6 or earlier 5 CVP by end of turn 8 3 CVP
German Principally German objectives are to prevent British acquiring VP’s.
A massive preliminary bombardment by artillery, bombers and Typhoons blasted the enemy positions and either side of the road, effectively knocking out many of the anti-tank guns which had been sited along the road due to lack of transport.
When the advance started, the lead tanks advanced 300 yards behind the creeping barrage which commenced at 14.35 hrs.
The leading Irish Guards squadron (no.3) was allowed to advance up the road by the Germans, who then ambushed the tail of the lead Squadron and second Squadron (no.1) from close range with Panzerschrecks. The column was then attacked by the Jagdpanzers and dug-in anti-tank guns. The Irish Guard Infantry disembarked and tackled the Germans by the road, taking in many prisoners pretty quickly. The tanks fired back and knocked out several Jagdpanzers with help from captured crews who pointed out known enemy positions. Significant numbers of German prisoners (250) taken from 15.30 hours after fighting had commenced between the Guards and the enemy.
The Typhoon cab-rank was then called in by the FAC attached to the Guards and this punished the enemy positions in and around the woods. The creeping barrage was then re-started in support of the Guards advance, with no. 3 Squadron being pulled back 500 yards and then recommencing advance at 16.30 hrs.
The Devonshires were soon involved in heavy hand-to-hand fighting with German troops from the start and bore the brunt of the infantry combat casualties. B Company was also caught up in friendly fire by the Typhoon air support. By nightfall they had arrived in the woods ahead of them around Hoek and set-up defensive positions, with the other group 5km away forming a defensive position on the edge of the woods.
XXX Corps advanced over the Dommel bridge at 17.30 hours with no.3 Squadron taking up defensive positions and no.2 Squadron supported by no.4 Company capturing Valkensward around 20.30hrs. At this point in the darkness the Irish Guards harboured for the night around the central square of Valkenswaard. 9 tanks had been lost and eight men killed from 2nd Battalion, 7 killed and nineteen wounded from 3rd Battalion. The advance resumed at 07.00hrs next morning with a squadron of the Household Cavalry in the lead. At that point contact had been made with the Dutch REsistance in Eindhoven who reported no sign yet of US Airborne. XXX Corps’ advance was already well behind schedule.
This is a challenging scenario for both sides in actual fact and involves a tremendous amounts of hardware and rules around barrages etc. which KGCIII handles very well. There is quite a lot for players to take in though and those less experienced with rules should probably start with Scenario II, Best: The Hornets Nest and play this one second.
The British player(s) must get Irish Guards going quickly and try and use the Devonshires as effectively as possible. The Germans need to think about how and when they attack and try to conserve their force morale so they can continue to engage the British. The Germans may well find that, as in real life, their forces fall apart under pressure and surrender pretty quickly.
Force Morale: 8 7 6 5 4 3 2 1 (see page 37-38)
XXX Corps at this time was commanded by Lt General Brian Horrocks. The Irish Guards Battlegroup was commanded overall by J.O.E Vandeleur (see A Soldiers Story). I’ve presented the two battalions as two separate battalions, one tank, one infantry. However we have tried the scenario as two mixed ‘kampfgruppe’ style battlegroups with a mix of 1 or 2 tank units and 1 or 2 infantry units. This is because at this stage of the war infantry companies in the Guards were commonly attached to tank squadrons and you could interpret the organiseation this way using KGCIII. If you do this you might want to alter the Unit stats as I’ve downgraded 3rd Battalion slightly due to the reported high casualties, particularly officers, mentioned in the Battalion Diary.
2nd Battalion Irish Guards
Lt. Col. Giles Vandeleur
Command: +2(+2) Morale: 8 Training: Veteran Response:8 Hits:3-1
(1) 2 x Sherman V, 1 x Firefly (2) 2 x Sherman V, 1 x Firefly (3) 2 x Sherman, 1 x Firefly.
Assets: 1 x Recon Honey 1 x Air FO 2 x Artillery FO’s (1 Per Artillery Regiment) - distribute as required.
3rd Battalion Irish Guards
Lt. Col J.O.E Vandeleur
Command: +1(+1) Morale: 8 Training: Regular Response: 7 Hits: 2+1
(1) 3 x Rifles (2) 3 x Rifles (3) 3 x Rifles
(4) 3” Mortar ####
Assets: 1 x MG, 1 x 6pdr ATK, 1 x Recce Bren Carrier
Transport: Either Truck or tank riding (1 company per tank squadron). 6pdr, Mortar and MG’s are in carriers.
2nd Battalion The Devonshire Regiment, Group 1 (A & C Companies, to clear woods West side of road)
Lt. Col. Sir John G Carew Pole, Bart.
Command: +1(+1) Morale:8 Training: Regular Response: 7 Hits:2+1
(1) 3 x Rifle (2) 3 x Rifle (3) 3” Mortar ####
Assets: 1 x 6pdr ATK, 1 x MG, 1 x Recce Bren Carrier
Transport: on foot. 6pdr, MG and Mortar have carrier transport.
2nd Battalion The Devonshire Regiment, Group 2 (B & D Companies, clear woods on road to Hoek)
Major G B Browne
Command: 0(+1) Morale:8 Training: Regular Response: 7 Hits: 2+1
(1) 3 x Rifle (2) 3 x Rifle (3) C Sqdn Kings Hussars 3 x Cromwell
Assets: 1 x 6pdr ATK, 1 x MG
Transport: on foot, 6pdr, MG and Mortar have carrier transport.
Off-table
64th Medium Regiment RA
Non-requestable. Dedicated to Rolling Barrage. Also fires 2 rounds in Pre-Game bombardment.
5.5” 5.5” 5.5” FV: 6
(barrage width approcimately 16”: 1.6km wide and 8km deep. If advancing at 500m a round as per rules, would advance for 16 turns)
55th Field Regiment RA
25pdr #### 25pdr #### 25pdr #### all batteries OS
Request: 8 Availability: 8 FV: 3
All batteries may fire 2 additional rounds in pre-game bombardment
153rd Field Regiment RA
self-propelled Sexton #### Sexton #### Sexton #### all batteries OS
Request: 8 Availability:8 FV:3
All batteries may fire 2 additional rounds in pre-game bombardment
Air Support
RAF Typhoon Squadron
Typhoon (rockets) Typhoon (rockets) Typhoon (rockets)
Request: 7 Accuracy: 3
A new squadron is available every turn from the overhead cab-rank
Force Morale: (6) 5 4 3 2 1 (brackets morale is optional)
Kampfgruppe Von Hoffman: Training & Replacement Fallschirmjager Battalion I
Major Kerrut
Command: +1 (+0) Morale: 6 Training: Green Response: 7 Hits: 2 -1
(1) 3 x FJ Rifle (2) 3 x FJ Rifle (3) 3 x FJ Rifle * anti-tank Unit: FV 8
(4) 150mm SIG IG ## (5) 81mm Mortar ##
Assets: 3 x MG, 2 x Russian 76.2mm AT Guns, 1 x 20mm QUAD FLAKvierling, 1 x 88mm FLAK 1 x Artillery FO
Transport: Minimal. The AT guns and FLAK were sites either side of the main road due to lack of motor transport.
Fallschirmjager Regiment 6
Lt. Col von der Heydte
Command: +2 (+1) Morale: 7 Training: Green Response: 8 Hits 2
(1) 4 x FJ Rifle (2) 4 x FJ Rifle (3) 4 x FJ Rifle
(4) 81mm Mortar ## (5) 81mm Mortar ## (6) 120mm Mortar ##
Assets: 1 x 20mm Flak, 1 x Pak40 ATK, 1 x Infantry Recce, 3 x MG, 1 x Engineer
Transport: The anti-tank, infantry recce and engineers are motorised in trucks.
SS Roestler
Roestler Command: +1 (+) Morale: 7 Training: Veteran Response: 8 Hits: 2
(1) 2 x Jagdpanzer IV/70 (2) 3 x SS Rifle
SS Segler (Optional)
Segler Command: +0 (+1) Morale: 7 Training: Veteran Response: 8 Hits: 2
(1) 3 x SS Rifle (2) 3 x SS Rifle (3) 81mm Mortar ##
Assets: 2 x MG, 2 x Pak40 ATK
Artillery (off table, probably)
10SS Motor Battery 1 x battery 105mm Wespe ##
last update 22/5/21