4 DAYS IN SEPTEMBER
SCENARIO 3 - CROSSING THE WAAL
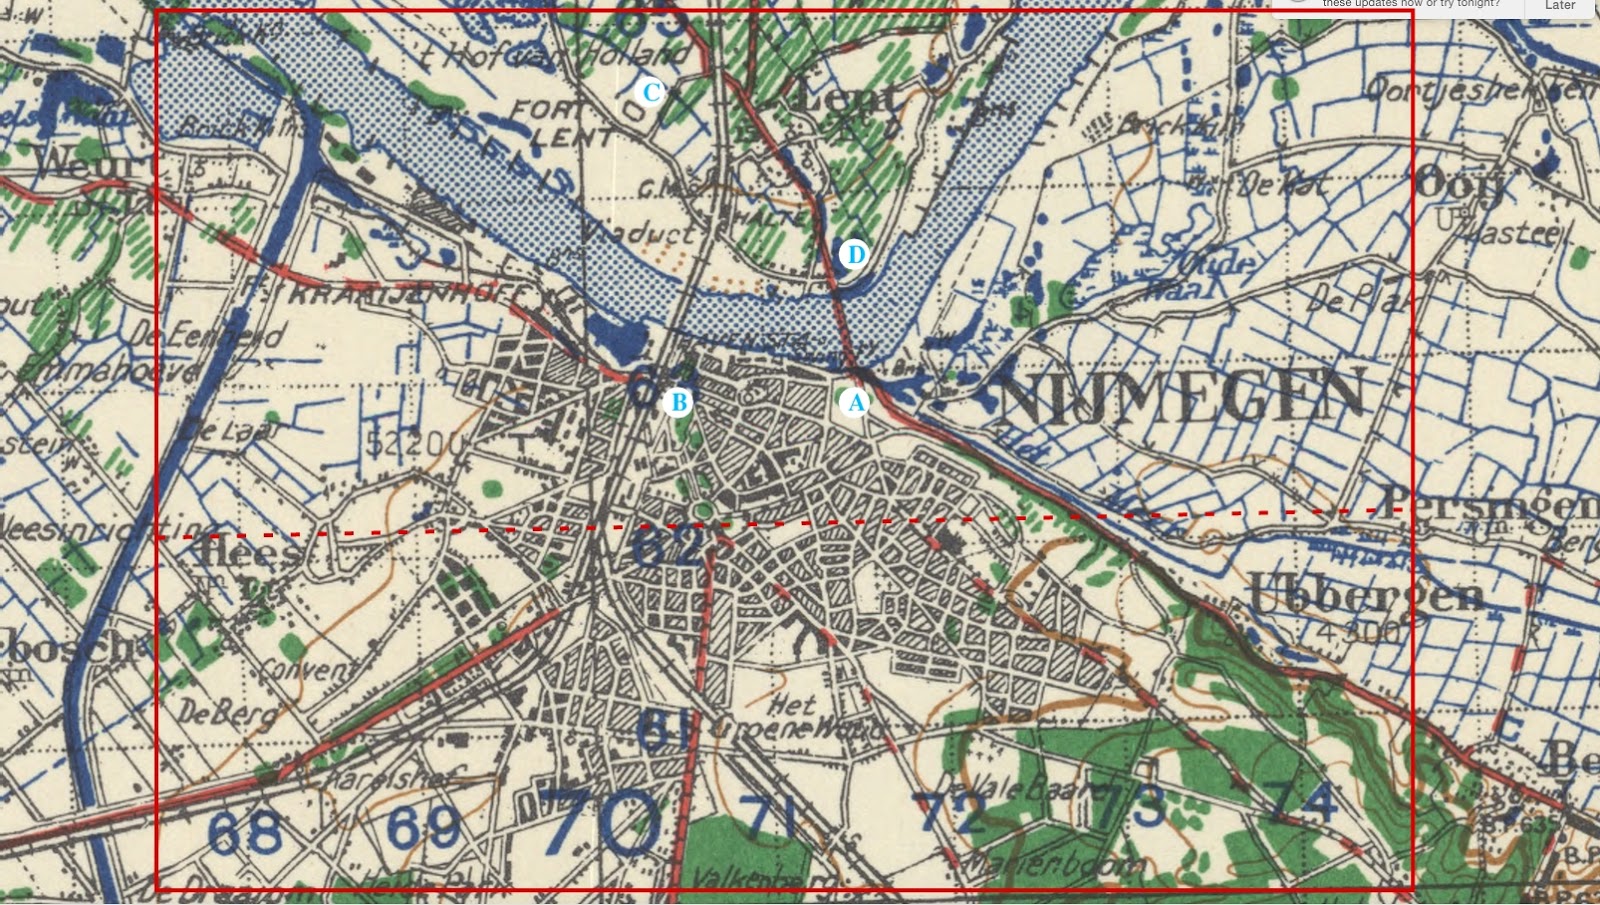
Battle map based on WW2 Topographic Maps from McMaster University Library
Used under Creative Commons Attribution-NonCommercial 2.5 Licence
Click map to enlarge
This third game in the KGC III Campaign sees one of the most heavily contested battles in Operation Market Garden: Nijmegen. Many see Nijmegen as the battle where Market Garden failed, and as a wargame scenario it is a real challenge for the Allied forces.
The 82nd ‘All American’ Airborne Division was dropped to the South East of Nijmegen around the Groesbeek Heights which was seen as strategically important. US forces were expected to protect the vulnerable right flank of the Allied armoured thrust from the nearby German forces in the Reichswald forest.
Additionally, several bridges required to be captured, including Grave and the Rail and Road Bridges at Nijmegen. On the 17th of September Grave bridge was captured and the Groesbeek Heights were secured. The main direct route bridges on the Maas-Waal Canal were blown but another secondary crossing was captured. However it was only till late on in the 17th that two companies of infantry from 1/508th was sent into Nijmegen to try and capture the bridges. This was very unfortunate as early on the 17th the Bridges were only lightly defended. However, becoming aware of the importance of the bridges as the 17th worn on, scratch troops had been sent into Nijmegen and Kampfgruppe Henke had been coalesced to try and defend the bridges and these repulsed the US Paras, with German motorised reinforcements arriving just as the Paras attacked. During this initial fierce battle it is thought that the demolition mechanism for the bridge was destroyed in the Post Office, which was to prove critical for the later battle for the Bridges.
The battle was to rage on into the 19th, and our Campaign now takes two alternate paths.
If the Allies have accrued 8 or more Campaign Victory Points, then play Scenario 3A. If they have less than 8 Points, play Scenario 3B.
3A assumes a better than historical performance by the Allies, and XXX Corps is close to schedule. This sees the Irish Guards battlegroup arrive at some point in the afternoon of D+1, the 18th. In the early morning of the 18th, the 1st and 3rd Battalions 508th had been heavily engaged in Nijmegen. The 3rd Battalion returned to defend the drop zone during the morning. Scenario 3A sees Irish Guards arrive to reinforce the US Paras and attempt to force the crossing, critically before some German reinforcements have arrived.
3B follows more closely the historical timeline. It is however still possible for XXX Corps to cross in time to get to Arnhem and reinforce Frost. Scenario 3B sees the action take place in the afternoon of D+2, the 19th and then through the day of D+3, the 20th.
See map above. Table Outline is in red based on a standard 6’x4’ table with ground scale of 1inch=100 metres. One map square=1 Kilometer (10" on table).
When setting up the table we put numerous built-up areas on the table corresponding to the approximate area of Nijmegen on the map. We had the main red roads and red dashed roads, and the railway, deployed on table but not the wee minor roads which we classed as open ground. The main river, the Waal, itself was deployed as shown on the map and is 300 metres (3 inches) wide at Nijmegen.
The Fort Hof Van Holland and the Fort Valkhof were old fortifications and should be strongpoints. The SS engineers laid mines around the Valkhof.
We also deployed open areas South of both bridges to show the Kronnenburger and Hunner Park as per the map. This makes the Allied attacks more difficult.
Red Dotted Line: Allies- US Forces may deploy anywhere South of the red dotted line. Note this is in close contact with German forces.
Irish Guards & other Reinforcements enter from either of the two red marked roads on the map to the South or South West.
Blue Letters: Germans - Forces are deployed as follows on the map A: Hunner Park & Fort Valkhof - Kampfgruppe Euling B: Kronenburger Park / Railway Bridge Southern ramp - Fallschirmjager Henke, 10SS Engineers (part) C: Fort Hof Van Holland & North Bank Waal - HQ Fallschirmjager Henke & Wehrkreis VI D: Scenario 3B only - SS Kampfgruppe Reinhold.
Historical deployment is as per the set-up above.
(see page 59 & 60) These games start with troops in contact so there is no pre-game reconnaisance or bombardment. German troops on the North side of the river before game starts may be classed as Hidden using one of the methods used in the rule book, see Observation pgs 27-28 and Scouting pgs 51-52.
Scenario 3A 18th September to morning 19th September The scenario lasts for 8 turns. The first four represent the attacks by 3/508th afternoon of 18th September supported by Irish Guards battlegroup when they arrive, through to the morning of 19th when the Germans mounted a counter-attack at the Groesbeek heights infiltrating the landing zone.
Scenario 3B 19th September late afternoon - end of day 20th September The scenario lasts for 11 turns. The first 3 turns represent the late afternoon attack by the Guards Division supported by the 2/505th. The rest of the scenario is the action on the 20th September which lasted all day, culminating with the river assault on the Waal by 3/504th.
In both Scenarios, victory is determined by the Allied players exiting at least three Irish Guards Units off the Northern road. Recce units do not count, and at least 1 Unit must be armoured. American Para infantry Units can also count if they are tank riding.
Campaign Victory Points: Allied Scenario 3A: Achieve conditions by Turn 6 5 CVP Achieve conditions by Turn 8 4 CVP
Scenario 3B: Achieve conditions by Turn 8 3 CVP Achieve conditions by Turn 11 2 CVP
German Principally German objectives are to prevent Allies acquiring VP’s.
Historically the recently arrived Grenadier Guards hastily attacked with the 2/505th late in the day on the 19th but didn’t manage to capture the bridges. The following day the battle raged on with XXX Corps capturing Nijmegen but unable to take the bridges.
The Irish Guards and the 3/504th captured the river bank opposite the Fort Hof Van Holland early on in the morning of the 20th. They waited for the assault boats to arrive before they could cross the Waal. Meanwhile, bitter fighting between the SS defenders and XXX Corps and Airborne was ongoing in Nijmegen. At 3pm Major Julian Cook and two companies of the 3/504th with artillery support, Spitfires and fire from the Irish Guards tanks. Under smoke cover, Cooks men captured the Railway Bridge and the Grenadier Guards tanks started to roll over it and the Waal Road Bridge which was also then captured. German attempts to detonate the bridge charges failed.
With daylight running out and no Guards infantry support, and having encountered German anti-tank units on the other side of the bridge, the Guards halted. This was the final chance of reaching Arnhem in time.
This is a really challenging Scenario for the Allies, particularly 3B with the increased German forces and the 88’s.
The Germans must hold on as long as possible on the Nijmegen side where they have sufficicent cover to try and take on the armoured units. It is particularly difficult for the Allies to quickly make ground here against the SS and the Engineers. Over the river the troops are poorer and the terrain is more open, but the FLAK provide more firepower to take on the tanks.
Both sides need to use Artillery support wisely and this can be key to success.
3/504th may attempt a River Crossing over the Waal once they hold the southern bank of the river. In reality the 3/504th captured the southern bank on the evening of the 19th and were scheduled to go over at 08.00 hours on the 20th, but this was delayed and further delayed until 3.00pm.
In the game to simulate this, once the 3/504th capture a river bank, roll a d6 each turn with the assault boats arriving on a roll of a 6. Add a cumulative one to the dice each turn after the first.
Crossing the River should take a move order per Company, with only 1 company crossing at a time. Bear in mind there will be no cover for those crossing, and they will require appropriate support.
Allied Reinforcements Scenario 3A: The Irish Guards arrive on Turn 1 on a roll of 5,6 on a d6, otherwise they arrive on Turn 2.
Scenario 3 B: the battle is fought by 2/505th and the Irish Guards from Turn 1, with the 3/504th reinforcing from Turn 3. Roll 1d6, arrive that Turn on a roll of 5,6 adding 1 to dice each turn
Force Morale: 7 6 5 4 3 2 1 (see page 37-38)
3A - 1st Battalion 508th Parachute Infantry Regiment, 82nd Airborne Div.
Lt. Col. Shields Warren
Command: +1(+1) Morale: 8 Training: Veteran Response:7 Hits:3
(1) 3 x Para Rifle (2) 3 x Para Rifle (3) 3 x Para Rifle
(4) 81mm Mortar ### (5) 60mm Mortar #### (FV3)
Assets: 2 x MG
Transport: on foot
3B - 2nd Battalion 505th Parachute Infantry Regiment, 82nd Airborne Div.
Lt. Col. Ben Vandervoort
Command: +1(+1) Morale: 8 Training: Veteran Response:7 Hits:3
(1) 3 x Para Rifle (2) 3 x Para Rifle (3) 3 x Para Rifle
(4) 81mm Mortar ## (5) 60mm Mortar ## (FV3)
Assets: 2 x MG
Transport: on foot
Reinforcements
3A & 3B - Irish Guards Battlegroup Surviving troops from Scenario 1: from 3rd Battalion Irish Guards, 2nd Battalion Irish Guards, 55th Field Regiment RA and 153rd Field Regiment RA (self propelled).
3B - 3rd Battalion 504th Parachute Infantry Regiment, 82nd Airborne Div.
Major Julian Cook
Command: +1(+2) Morale: 8 Training: Veteran Response: 7 Hits:3
(1) 3 x Para Rifle (2) 3 x Para Rifle (3) 3 x Para Rifle
(4) 81mm Mortar ### (5) 60mm Mortar #### (FV3)
Assets: 2 x MG, 2 x Assault Engineers
Transport: on foot
Air Support
RAF Spitfire Squadron Request Spitfire Spitfire 7 Accuracy 3
Force Morale: 6 5 4 3 2 1
Following forces found in Both 3A & 3B Scenarios:
SS Kampfgruppe Euling Panzer Grenadier Regiment 33 (inc Wehrmacht & Police Reserves)
SS Lt. Col Karl-Heinz Euling
Command: +1 (+2) Morale: 7 Training: Regular Response: 7 Hits: 2
(1) 3 x Pzr Gren Rifles (2) 3 x Rifle (3) 3 x Rifle
(4) 3 x SS Engineers, Brandt (5) 1 x JgdPzrIV
Assets: 2 x MG, 1 x Pak 40, 1 x Infantry Recce, Minefields
Transport: Unit 1 Panzer Grenadiers have access to Hanomags.
Fallschirm Henke - Herman Goering Training Rgt. & 10SS Engineer Co. Baumgartel
Command: +1 (+1) Morale: 7 Training: Regular Response: 8 Hits 2
(1) 3 x SS Rifle (2) 3 x SS Rifle Engineers (3) 3 x Rifle
(4) 81mm Mortar ## (5) 81mm Mortar ##
Assets: 1 x 20mm Flak, 1 x Pak40 ATK, 2 x MG
Transport: for Pak only.
HQ Fallschirmjager Regiment Henke, North Bank, & Ersatz Battalion Wehrkreis VI Fall.
Oberst Henke
Command: +1 (+1) Morale: 6 Training: Green Response: 7 Hits 2
(1) 4 x FJ Rifle (2) 3 x Rifle
(3) 81mm Mortar ##
Assets: 2 x 20mm FLAK
Transport: None
Artillery: 1 x FO, attach as required Off table batteries 155mm ## 155mm ## 155mm ## Request:6, FV:6
3B only:
SS Reinhold, North Bank
SS Capt. Leo Herman Reinhold
Command: +2 (+1) Morale: 6 Training: Green Response: 7 Hits 2
(1) 3 x Rifle (2) 3 x Rifle (3) 3 x Rifle
(4) 81mm Mortar ## (5) 120mm Mortar ##
Assets: 2 x 88mm FLAK
Transport: None
Artillery: 1 x FO, attach as required Off table batteries 155mm ## 155mm ## Request: 6, FV: 6
last update: 22/5/21