4 DAYS IN SEPTEMBER
SCENARIO 2 - BEST: THE HORNETS NEST
Battle map based on WW2 Topographic Maps from McMaster University Library
Used under Creative Commons Attribution-NonCommercial 2.5 Licence
Click map to enlarge
The second game in the KGC III Campaign is based on the less well known battle around the village of Best. Best was selected as a secondary objective for 101st Airborne during the pre-drop planning. This was to provide an alternative crossing over the Wilhelmina Canal to the favoured prime objective of the Son Bridge. The game takes place from the afternoon of 17th September through to midday on the 18th September.
On the day Son was blown in the face of the 101st Airborne paras. Best therefore became a key battleground with both sides sending in reinforcements to capture the bridge.
Should the Best bridge be captured by the Allies, it would provide a rapid alternative crossing that is only 6km away from Son. This makes this a critical scenario in the Campaign, and if the Americans can capture and hold the bridge long enough for XXX Corps to arrive, they can get Market Garden back on schedule. Of course, the German forces must do their utmost to prevent this with only a scratch force of recently retreated troops to take on fresh and highly motivated US Paratroops.
American initial forces consist of H Company, 3rd Battalion 502nd Parachute Infantry Regiment with Assault Engineer support. Unknown to the Americans, Best is defended by Flak Abteilung 424 situated in and around the town. These rapid fire weapons and the rapidly escalating German forces make the town a proverbial hornets nest for the Allied forces.
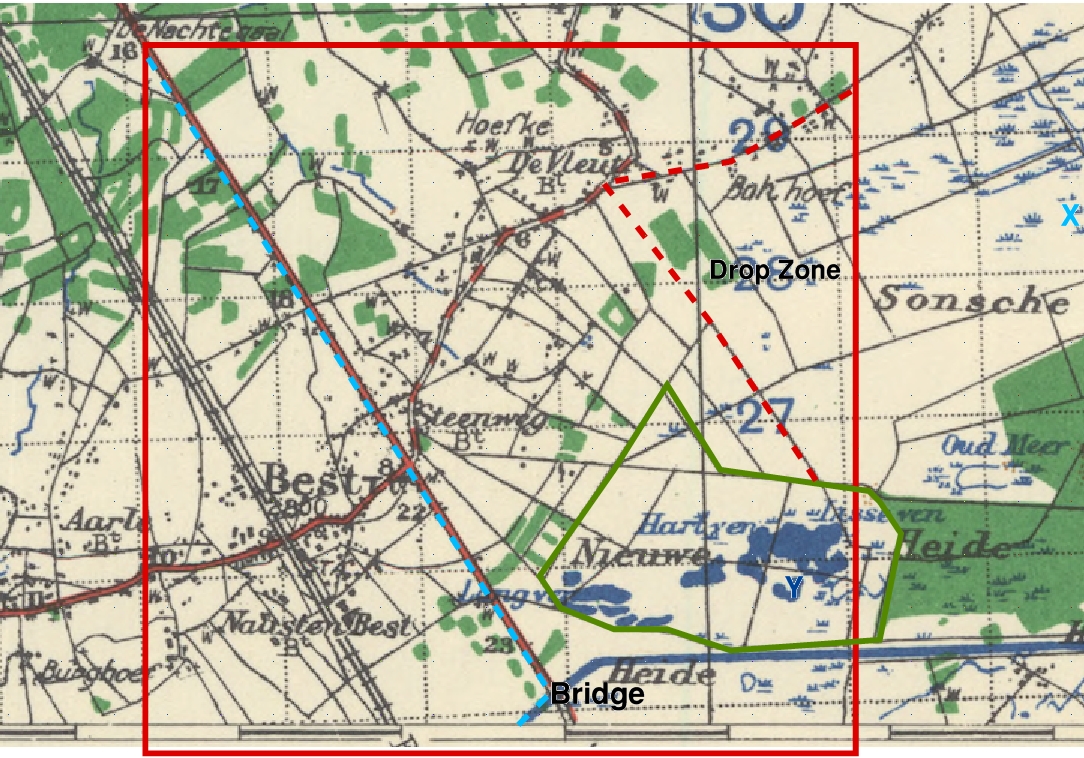
See map above. Table Outline is in red based on a small 4’x4’ table with ground scale of 1inch=100 metres. One map square=1 Kilometer, 10" on table.
When setting up the game on the table we had the main road on table and the road from Best through to De Vleut. Best was represented by three or four building areas. Much of the rest of the table was open, in reality it appears to be a network of fields which are often tree lined. I think the ‘Nieuwe’ area with various lochs may actually have been forested in 1944 so I have added a green line on the map to show where I think the forest edge should be. This was important in the actualy battle as this was where the Paras advanced through to try and get to the Bridge.
Red dotted line: US Paras deploy to the East of here. Reinforcements also come on this table edge.
Blue Line: German forces may deploy anywhere West of this line, infantry are in slit trenches. German reinforcements come in from the road edge to the North West or from the road to the West of Best.
Allies: The US Paras entered from the drop zone and headed straight for the centre of Best. H Company deploys first with an MG asset and the Assault engineers in support. The rest of the Battalion arrives on Turn 3 as local commanders realise they need backup.
Germans: The Flak guns were historically deployed at the main road and junction at Best to from a road block and a blocking line at the main road. Germans have seen the para drop and are expecting action. See Reinforcements for further troops arrivals.
This game starts immediately after the landings, and as such there has been no time for pre-game reconnaissance or bombardment. All German forces on table before game start are HIdden, using one of the methods used in the rule book, see Observation pgs 27-28 and Scouting pgs 51-52.
The scenario lasts for 8 turns. The first 4 turns represent the afternoon of the 17th of September as the 3/502nd marches off the drop zone and towards Best. Reinforcements from the 2nd Battalion arrive from Turn 4 and represent the morning attack by the 2nd Battalion on 18th September that was bloodily repulsed. The game ends on Turn 8, with historically the US troops observed the bridge being blown around mid-day on the 18th. To capture a Victory location the player needs to have boots on the ground on the Victroy location and not to have enemy able to close assault the feature, having it 'under fire' is not enough.
Campaign Victory Points: American Asess at end of Turn 8:
US forces Hold the Bridge 3 CVP Retain the Landing Zone 1 CVP Capture and hold Best crossroads 1 CVP
German Principally German objectives are to prevent British acquiring VP’s.
Both sides appear to have been caught off guard. Best was lightly held by German troops in the form of a Flak Abteilung to defend the bridge from bombers. It took the Germans some time to co-ordinate holding the bridge and then blowing it.
The American attack was lead by a sole US Para company - H Company led by Captain Robert E. Jones, supported by a platoon of Engineers and an LMG team. These men boldly set out towards Best, aiming to find the main road, establish a roadblock then move down to capture the Bridge. They were unexpectedly heavily engaged by German MG teams and the FLAK as they approached Best, and the unit became separated.
Lt.Col Cole committed the rest of the battalion on hearing of the heavy resistance, and Lt. Wierzbowski with engineers and a MG managed to push south going through the forest and by nightfall had managed to get within 100 yards of the Bridge. These brave troops held out on the side of the canal and were engaged constantly by German troops through the night and became completely cut-off. The rest of the battalion was heavily engaged and had retreated to the forest edge to the East of Best.
In the morning, day 2, the Regiment committed 2nd Battalion under Lt. Col. Chappuis as the realisation of the significance of capturing the crossing now that Son had been blown on day one. A text-book attack was launched from the Landing Zone which started well but then came under devastating fire from the village. The Battalion suffered terrible casualties and pulled back to regroup. They were later ordered down through the forest through 3rd Battalion lines, with the under heavy fire 3rd Battalion c/o Lt. Col. Robert Cole falling in battle to a sniper while attempting to call in air support.
Meanwhile at the bridge Lt. Wierzbowksi’s men were in a desperate battle with German troops and were taking heavy casualties. The platoon was cut-off and unable to make contact with battalion. 2nd Battalion were not able to get through to the cut-off men at the bridge and the bridge was blown at 11am by German troops. It’s likely this happened after XXX Corps forward recon units were approaching. With the loss of the bridge at Son, and the alternative at Best, XXX Corps would be delayed until the following morning, the 19th, until they could resume their advance.
This is an interesting scenario that is perhaps not as well known as the other main battles. The Allies can potentially have a significant effect on the outcome of Market Garden if they can capture and hold the bridge.
The initial German forces are quite powerful and they will increase in strength as the game goes on. Rapid capturing and holding of the bridge will be critical to the Americans success.
Both sides receive reinforcements in this scenario.
German Reinforcements The GM or German Player should roll for reinforcements from Turn 2 with a d6. Cross off each number when it is rolled and if a number is re-rolled then roll again. The Germans arrive by road - d6 which 1,2,3 North road or 4,5,6 West of Best.
d6 roll 1 No reinforcements 2 Grenadier Battalion II 3 No reinforcements 4 Grenadier Battalion I 5 No reinforcements 6 SS Police Battalion
American Reinforcements These arrive from Turn 4 onwards. Roll a d6 each turn, with the reinforcements arriving at the drop zone table edge on a roll of 5 or 6. Add one to the dice roll each subsequent turn from Turn 4.
Force Morale: 6 5 4 3 2 1 (see page 37-38)
3rd Battalion 502nd Parachute Infantry Regiment, 101st Airborne Div.
Lt. Col. Robert G. Cole
Command: +1(+2) Morale: 8 Training: Veteran Response:7 Hits:3
(1) 3 x Para Rifle (2) 3 x Para Rifle (3) 3 x Para Rifle
(4) 81mm Mortar ### (5) 60mm Mortar #### (FV 3)
Assets: 2 x MG, 2 x Assault Engineers
Transport: on foot
Optional Deployment: Historical deployment would be units (1), the Assault Engineers and 1 x MG arrive on Turn 1. The rest arrive later on Turn 3 as the lead company is reinforced.
Reinforcements
2nd Battalion 502nd Parachute Infantry Regiment, 101st Airborne Div.
Lt. Col. Chappuis
Command: +1(+1) Morale: 8 Training: Veteran Response: 7 Hits:3
(1) 3 x Para Rifle (2) 3 x Para Rifle (3) 3 x Para Rifle
(4) 81mm Mortar ### (5) 60mm Mortar #### (FV 3)
Assets: 2 x MG, 2 x Assault Engineers
Transport: on foot
Air Support
Ad-hoc P47 Thunderbolt Request P47 Thunderbolt 7 Accuracy 3
Force Morale: 7 6 5 4 3 2 1
Flak Abteilung 424
Command: +1 (+0) Morale: 7 Training: Regular Response: 8 Hits: 2
(1) 3 x 20mm QUAD FLAK vierling (2) 2 x 88mm FLAK (3) 3 x Rifle
(4) 81mm Mortar ####
Assets: 1 x MG
Transport: Minimal. The AT guns and FLAK were historically deployed around main road junction at Best.
Optional: Bridge Guard - an additional detached Platoon of infantry can be Guarding the bridge at Best,. this is a Unit with only 1 stand strength. This is probably over-stating the guard, but there was also some fire support from off-table so probably balances this out.
Reinforcements
SS Police Battalion
Command: +1 (+2) Morale: 8 Training: Veteran Response: 8 Hits 2
(1) 3 x SS Rifle (2) 3 x SS Rifle
(3) 81mm Mortar ##
Assets: 1 x 20mm Flak, 1 x Pak40 ATK, 1 x Infantry Recce, 2 x MG
Transport: Motorised in Trucks
Grenadier Battalion I, 59th Division
Command: +1 (+1) Morale: 7 Training: Regular Response: 7 Hits 2-1
(1) 3 x Rifle (2) 3 x Rifle (3) 3 x SS Rifle
(4) 81mm Mortar ### (5) 120mm Mortar ###
Assets: 1 x Infantry Recce, 2 x MG, 1 x Engineer
Transport: Motorised in Trucks
Grenadier Battalion II, 59th Division
Command: 0 (+1) Morale: 7 Training: Regular Response: 7 Hits 2-1
(1) 3 x Rifle (2) 3 x Rifle
(3) 81mm Mortar ### (4) 120mm Mortar ###
Assets: 1 x Infantry Recce, 2 x MG
Transport: On Foot.
last update 30/5/21