4 DAYS IN SEPTEMBER
SCENARIO 4 - ARNHEM BRIDGE
Battle maps based on WW2 Topographic Maps from McMaster University Library
Used under Creative Commons Attribution-NonCommercial 2.5 Licence
Click map to enlarge
larger Arnhem map here
Arnhem Bridge is the final battle of our 4 Days in September Campaign and sees the valiant attempt by 1st Parachute Brigade and supports to capture the road and rail bridges at Arnhem during the first 4 days of the battle.
Major General R.E. Urquhart was in command of the British First Airborne Division which was to be dropped on heathland drop-zones 6 to 8 miles from the bridges at Arnhem. Critically, the division could only be dropped over three days, and we will follow the 1st Parachute brigade which was dropped on day one and their dash into Arnhem. Later drops were interrupted and delayed by enemy action, or were used to defend the landing zones and later the shrinking perimeter at Oosterbeek, and we won’t use them for this battle.
German troops on the ground consist initially of scratch training battalions and reserves, but the Paras quickly run into hardened SS troops rushed into Arnhem from the surrounding area. Expecting ‘old men on bicycles’ and rear area troops, the British are unexpectedly caught out by two re-fitting SS Panzer divisions and end up fighting one of the hardest fought battles of the war.
The entire campaign depends on the result of this battle, and there are three Scenario variations. We select a scenario depending on how well the Allies did during the rest of the campaign. Each scenario has a different stage of the battle at which XXX Corps arrives, if at all, and also the strength of the German forces.
There are three different Scenarios 4A, 4B and 4C depending on the number of Campaign Victory Points accrued.
12+ points play Scenario 4A: Bang on Schedule. XXX Corps arrives in Arnhem early D+2, 19th September.
8+ points play Scenario 4B: Late but just in time. XXX Corps arrives in Arnhem early D+3, 20th September.
Fewer points play Scenario 4C: Historical outcome. XXX Corps fails to arrive in Arnhem before historical resistance at the bridge collapses overnight end of D+3, 20th September, with the survivors breaking out on morning of 21st September.
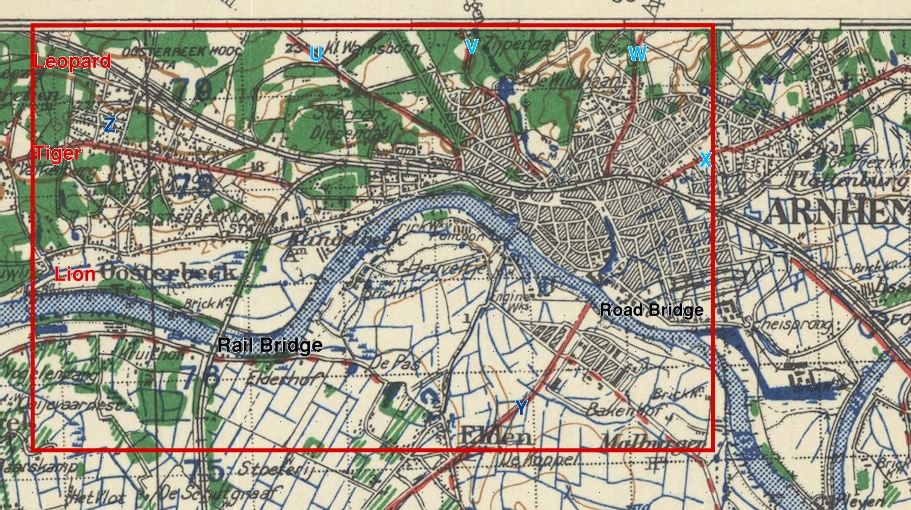
See map above. Table Outline is in red based on a standard 6’x4’ table with ground scale of 1inch=100 metres. One map square=1 Kilometer (10" on table).
When setting up the table we put numerous built-up areas on the table corresponding to the approximate area of Arnhem. The areas around the city centre near the bridge we made stone buildings, whereas much of the rest of the sub-urbs were wooden building zones. We also placed stone buildings zones at several important locations - notably St.Elizabeths Hospital/Museum area at the Western edge of Arnhem, and the Hartenstein Hotel area. Note that the northern ‘off’ ramp from the road bridge is a significant relatively open area. There is a large Cathedral here, St Eusebius, which was tactically important as a snipers nest.
There is also two areas high ground which had an important part to play as it dominated the approaches to the bridge - this is found at the St.Elizabeths Hospital / Museum area which dominates the lower road to the Arnhem bridge, and also the high ground which was at least partly forested to the north of Arnhem. West of Arnhem is a series of forested areas interspersed with open ground, and then the village / small town of Oosterbeek in and around the forest. To the West, off table, is the dropping zones. South of Oosterbeek to the Railway bridge is open ground. The southern side of the river is largely open ground, with a built up stone building area at the Brick Works in the bend on the river, which again was a significant German position in the battle.
We had the main red roads and red dashed roads, and the railway, deployed on table but not the wee minor roads which we classed as open ground or town zones. The main river, the Nederijn, itself was deployed as shown on the map and is 200 metres (2 inches) or so wide at Arnhem.
German forces deployed are the SS Krafft being the only real formation on the ground as they were training in the woods and heaths around Oosterbeek when the landings took place. They form a blocking line to the West of Oosterbeek around point Z on the map, with one Company in the centre of Arnhem. German reinforcements come along the roads to the North U, V, W and X. These can be randomly determined when the Germans enter. The only other entry point is Y where SS Graebners recon battalion attacks the Road Bridge from the South. The survivors from this attack then took up positions on the southern side of the Rhine at the Brick Works, and contributed to the deadly crossfire that stopped the Paras in their charge through to reinforce Frost and the Engineers at the bridge.
The British Parachute Battalions each enter along one of the main routes into Arnhem. The 2nd Battalion under Frost follows the Lion route, with a Company attempting to capture the Rail Bridge, then the rest went along the riverside to the Arnhem Road Bridge.
3 Para under Fitch moves along the Tiger route, through Oosterbeek, with Dobies 1st Battalion moving down the Leopard Amsterdamseweg route and tasked with taking the Westerbouwing heights to the North of Arnhem. The 1st Airborne Reconnaisance Squadron in mg-armed jeeps under Gough were tasked with speeding down the Leopard Route to capture the road bridge ahead of the infantry.
These games start with troops moving into contact so there is no pre-game reconnaisance or bombardment. All German forces on table start the game counted as Hidden, using one of the methods used in the rule book, see Observation pgs27-28 and Scouting pgs 51-52. This helps the German player significantly.
All the Scenarios run for 12 Turns. See the Reinforcements section below to see what arrives for each side during the game.
Scenarios 3A & 3B will see a Campaign Victory for the Allies if at the end of Turn 12 the Allies hold at least 1 River Crossing over the Rhine. This is achieved by having at least one Allied Unit in control of each side of the crossing.
3C is in effect an unwinnable scenario for the Allies - the historical outcome, where XXX Corps can’t possibly make it in time before the road bridge fell to the Germans, and the best the Allies can hope for is an honourable defeat.
The Paras landed and initially progressed well, but once they get into Oosterbeek they started to become delayed by crowds of civilians. The German troops in SS Kraft quickly reacted and deployed blocking forces which again held up the British. Frosts troops arrived at the railway bridge only to find it blown in their faces as they approached, and they then moved on along the river road arriving at dusk at the Road Bridge along with Fitch’s engineers and some of the Recce troops.
No other units made it to the Road Bridge in any strength, and a confused situation developed as the German forces started to arrive in strength over the next hours and days. Soon German armoured car units arrived and blocking lines on the higher ground prevented the Paras from making it through to Frost at the bridge.
Heavy Artillery and tanks were then brought up which smashed Frosts perimeter at the bridge. An attack by the SS Recon battalion was defeated by Frosts men, but with rising casualties a ceasefire was arranged to evacuate the wounded.
By the evening of Day 4 Frost was wounded and captured, and organised resistance gradually faded away at the bridge with a final radio transmission heard by the Germans of “Out of Ammunition, God Save the King!”.
The battle at the bridge was over, and the focus of the operation shifted to the defensive pocket at Oosterbeek where the rest of General Urquharts 1st Parachute Divison made a determined final stand - but the overall objective of Market-Garden to get XXX Corps over the Rhine and into Germany was largely ended with the loss of the Arnhem Bridge.
The game sees a relatively fixed British Para Brigade tasked with charging into Arnhem as quickly as possible, while the Germans must delay the British as long as possible while their forces increase in strength.
This is a challenging scenario for both sides, and particularly the Germans must carefully balance their actions with their force morale. The British troops as in many ways stronger in terms of infantry, but if they start to take heavy casualties and are not in strong defensive positions they will likely start to find the German armour and armoured cars too strong.
In all scenarios reinforcements are generated by rolling a d8 from Turn 2 onwards. Cross off each number as you roll them - if the number is rolled again, then re-roll.
Allied Reinforcements & German Reinforcements
Scenario 4A:
1: KG Knaust 2: SS KG Spindler 9SS 3: SS KG Brinkmann 10SS 4: SS KG Graebner (only from turn 6. If earlier, re-roll) 5: RAF airstrike, 3 x Spitfire 6: Old men on bicycles - no effect 7: Polish Drop 8: PAN Dutch Resistance
Remnants Irish Guards XXX Corps from Nijmegen Scenario 3 arrive from Turn 7 (roll d6 start Turn 7, arrive on roll of 5,6. Repeat each turn, adding additional +1 each successive turn) at Point Y on map.
Scenario 4B:
1: KG Knaust 2: SS KG Spindler 9SS 3: SS KG Brinkmann 10SS 4: SS KG Graebner (only from turn 6. If earlier, re-roll) 5: RAF Airstrike, 3 x Spitfire 6: Old men on bicycles - no effect 7: Polish Drop 8: PAN Dutch Resistance
Remnants Irish Guards XXX Corps from Nijmegen Scenario 3 arrive from Turn 9 (roll d6 start Turn 9, arrive on roll of 5,6. Repeat each turn, adding additional +1 each successive turn)at Point Y on map.
Scenario 4C:
1: KG Knaust 2: SS KG Spindler 9SS 3: SS KG Brinkmann 10SS 4: SS KG Graebner (only from turn 6. If earlier, re-roll) 5: Luftwaffe Airstrike, 3 x Me109 6: Assault Gun Brigade 280 7: KG Harder 8: Old men on bicycles - no effect
XXX Corps doesn’t arrive.
Polish Drop: Polish Battalions drop near to the battle zone. Some Polish troops filter through to the front line after fighting through their landing zones. 1d6 British Para units may recover 1-3 hits.
Dutch Resistance: 1 Unit of 3 Green Rifles appear from the Oranje Battalion of the Dutch Resistance. These may be added to any British Para formation. Each has 3 Hits.
1st Parachute Brigade, Brigadier Gerald Lathbury
Force Morale: 10 9 8 7 6 5 4 3 2 1 (see page 37-38)
further info here
1st Parachute Battalion
Lt.Col. David Dobbie
Command: +1(+1) Morale: 8 Training: Veteran Response: 7 Hits: 3
(1) 3 x Para Rifle (2) 3 x Para Rifle (3) 3 x Para Rifle
(4) 1 x 3” Mortar ### (5) 1 x Bren Carrier Scout
Assets: 1 x MG, 1 x 6pdr ATK, 1 x 17pdr ATK, 1 x Engineer
Transport: Jeeps/Carriers for 6pdr & Mortars
2nd Parachute Battalion
Lt. Col. Johnny Frost
Command: +2(+1) Morale: 8 Training: Veteran Response: 8 Hits: 3
(1) 3 x Para Rifle (2) 3 x Para Rifle (3) 3 x Para Rifle
(4) 1 x 3” Mortar ### (5) 1 x Bren Carrier Scout
Assets: 1 x MG, 1 x 6pdr ATK, 1 x Engineer f
Transport: Jeeps/Carriers for 6pdr & Mortars
3rd Parachute Battalion
Lt. Col. John Fitch
Command: +1(+1) Morale: 8 Training: Veteran Response: 7 Hits: 3
(1) 3 x Para Rifle (2) 3 x Para Rifle (3) 3 x Para Rifle
(4) 1 x 3” Mortar ### (5) 1 x Bren Carrier Scout
Assets: 1 x MG, 1 x 6pdr ATK, 1 x Engineer f
Transport: Jeeps/Carriers for 6pdr & Mortars
1st Airborne Recon Squadron
Major Freddie Gough
Command: +2(+1) Morale: 8 Training: Veteran Response: 7 Hits: 3
(1) 3 x Para Rifle
Assets: 2 x Engineer Assets
Transport: Recce MG Jeeps
(now fielding this as it's own Formation which is likely more accurate)
Reinforcements
4A & 4B - Irish Guards Battlegroup Surviving troops from Scenario 3: from 3rd Battalion Irish Guards, 2nd Battalion Irish Guards, 55th Field Regiment RA and 153rd Field Regiment RA (self propelled).
HQ - General Wilhelm Bittrich, 9th SS Panzer Division 'Hohenstaufen',
Force Morale: 12 11 10 9 8 7 6 5 4 3 2 1
SS Kampfgruppe Krafft
SS-Capt. Sepp Krafft
Command: +2 (+1) Morale: 8 Training: Regular Response: 8 Hits: 2
(1) 3 x Rifles (2) 3 x Rifle (3) 3 x Rifle
(4) 120mm Mortar (5) Trench Mortar (6) 1 x Engineer Inf Unit (deploys Southern End Arnhem Railway Bridge) (7) 1 x Rifle Unit (deploys in pill-box at Northern end Arnhem Road Bridge)
Assets: 2 x MG, Flamethrower
Transport: Trucks
Engineers: May be ordered to blow the Railway Bridge, but only once enemy troops have been observed and are in engagement range. Roll 1d6, bridge blows on 5 or 6. Add an extra 1 to the dice for each subsequent attempt.
Deployment: One Infantry Company must deploy in Arnhem, rest deploy in Oosterbeek.
Kampfgruppe Knaust
Major Hans Peter Knaust
Command: +2 (+1) Morale: 7 Training: Green Response: 7 Hits: 2-1
(1) 3 x Rifle (2) 3 x Rifle (3) 3 x Rifle
(4) 1 x Panzer III, 1 x Panzer IV (5) 1 x Tiger I (scenario 4B & 4C only)
Assets: none
Transport: none
Artillery: 1 x Artillery F/O, O/T 105mm ###, 105mm ###, Request=6 FV=4
SS Kampfgruppe Graebner
SS Capt. Victor Graebner
Command: +2 (+1) Morale: 8 Training: Veteran Response: 8 Hits: 3-1
(1) 1 x Sdkfz 234/2, 1 x Sdkfz 234/4, 1 x Sdkfz 231, 1 x Sdkfz 222 (2) 3 x SS Panzer Grenadier Rifle (3) 1 x Sdkfz 250/9, 1 x Sdkfz 222, 1 x MG Asset (scenario 4B & 4C only, to Brickworks)
(4) Sdkfz 250/7 81mm Mortar ##
Assets: 1 x MG, 1 x Motorcycle Recce
Transport: Grenadiers are in Sdkfz 250/1
SS Kampfgruppe Spindler (inc SS Moeller, SS Gropp, SS Von Alleworden)
SS Lt. Col. Ludwig Spindler
Command: +2 (+1) Morale: 7 Training: Regular Response: 7 Hits: 2-1
(1) 4 x Inf Engineers (2) 3 x Rifle (3) 1 x Jagdpzr IV
(4) 2 x 20mm AA (5) 1 x Panther
Assets: 1 x Pak 40, 2 x MG, 1 x Inf Recce
Transport: Engineers are in Hanomags.
Assault Gun Brigade 280
(1) 2 x Stug III attaches to any already deployed German Formation
SS Kampfgruppe Brinkmann (inc SS Panzer Grenadier Regt. 21)
SS Sturmbahnfuhrer Heinz Brinkmann
Command: +2 (+1) Morale: 7 Training: Veteran Response: 8 Hits: 3-1
(1) 1 x Sdkfz 234/2, 2 x Sdkfz 250/9, 1 x Sdkfz 222 (2) 3 x SS Pzr Gren Rifle (3) 3 x SS Pzr Gren Rifle (scenario 4B,4C only) (4) 3 x SS Pzr Gren Rifle (scenario 4B,4C only)
(5) 2 x King Tiger (scenario 4C only, arrives Turn 8) (6) 81mm Mortar ##
Assets: 1 x MG Asset per Rifle Company
Transport: Grenadiers are in Trucks.
last update 22/5/21